Future City Lab: New York's Water III
Lesson 3: Green Infrastructure
Interdisciplinary

Time Estimate: 30-45 minutes
Objectives:
Students will:
-
See clear demonstrations of the physical processes at work in New York City’s watershed and stormwater systems
-
Think about how green infrastructure can support the natural process of the water cycle and reduce pollution in New York City’s waterways
Materials:
-
Two 2-liter bottles
-
Coffee filter
-
Rubber band
-
Clean sand (can be found at local garden center)
-
Clean gravel or pebbles (can be found at local garden center)
-
Soil (can be sourced from outdoors)
-
Food coloring
-
Clear plastic shoebox or Tupperware container
-
Three cans
-
Plastic sheeting
-
(optional) Dry Portland cement mix – Type I-II or Type III-IV
-
(optional) Takeout container
Standards :
- CCSS.ELA-LITERACY.SL.2.2: Recount or describe key ideas or details from a text read aloud or information presented orally or through other media.
- CCSS.ELA-LITERACY.SL.2.3: Ask and answer questions about what a speaker says in order to clarify comprehension, gather additional information, or deepen understanding of a topic or issue.
Guiding Questions:
-
What is green infrastructure?
-
How can small design changes support the environment and improve quality of life in the city?
- Preparation
- Review
- Introduction
- Demonstration
- Types of Green Infrastructure (Slideshow)
- Activity/Homework
Procedures
In this lesson, students will see the processes of the previous two lessons at play: water filtration and water runoff. They will then be introduced to the concept of “green infrastructure” that can help absorb water and slow its runoff into New York’s waterways and support the natural processes of the water cycle.
Prepare each of the three demonstrations.
Water Absorption and Filtration:
1.) Take two two-liter bottles. Cut the top off of one (Bottle “A”) and the bottom of the other (Bottle “B”).
2.) Affix a coffee filter around the neck of Bottle B with a rubber band and turn upside down. Fit Bottle A, facing down, within top of Bottle A.
3.) Fill the Bottle B with one layer of coarse gravel, one layer of sand, and another of soil (and other organic materials, if desired).
4.) Prepare one cup of water with five drops food coloring.
Runoff:
1.) Take clear shoebox or Tupperware and put two or three cans inside in a group. (This is your “land.”)
2.) Cover cans with plastic bag or sheeting and arrange so water will run off cans into the container below.
Optional: Permeable Concrete (note: do at least one day in advance):
1.) Take gravel or pebbles and put enough in takeout container to cover bottom about 2-4 layers deep. Remove and weigh on a kitchen scale.
2.) Put gravel in separate bowl. Add in one-third weight cement mix.
3.) Put on gloves. Add small amount of water and mix thoroughly. Test concrete: try to form ball in your hands and see if it holds its shape. If it is too dry, add small amount of water and try again. If it is too wet, add small amount of cement mix until you get the right consistency. (See instructions at http://earthcareland.com/blog/tag/how-to-make-pervious-concrete/, and images at http://www.perviouspavement.org/materials.html for reference.)
4.) Pour mix out into takeout container and allow to dry for 24 hours. When done, you should be able to overturn container to remove. Test beforehand to see if water runs through.
Water Cycle: If students have already done the first lesson plan from this series, briefly talk through what they learned as part of that lesson. Otherwise, if the class has learned about the water cycle or is learning for the first time, review materials planned for that unit. Suggested titles to read aloud are Did a Dinosaur Drink This Water? By Robert E. Wells or Down Comes The Rain by Franklyn Branley.
Water Use: If students have done the second plan from this series, review how important it is to conserve water. Today’s lesson will talk about what happens to excess water in New York, for a different perspective on why water should be conserved.
Discussion as a class: today we’ll talk about what happens to excess water in the New York City water system. After we use water, it moves to our sewer system. Because of the way that our sewer system was built a long time ago (starting in the 1850s), too much moving water at once – like during big storms – can cause untreated sewage to go into our waterways. So we try to find ways to slow water down so it cannot pollute our rivers, and so it can go back into the water cycle naturally while keeping the city a greener, more pleasant place to live.
Run the demonstrations in sequence.
Demonstration #1: this setup mimics the natural process of filtration in New York’s watershed. Remind the students that water falls in the mountainous areas north of the city and gravity sends it through soil to naturally filter water.
Slowly pour the cup of water into the filter system. What happens? How quickly does it take to move through? What color is the water that comes through?
Demonstration #2: this setup mimics runoff coming off New York City’s streets and sidewalks. Ask students: what happens when water hits concrete? Where does water go during big storms? You can review storm drains and the sewer system in advance at the NYC Department of Environmental Protection’s site: http://www.nyc.gov/html/dep/html/stormwater/index.shtml
Before the demonstration, put five or so drops of food coloring on top of the plastic sheeting. Tell students that this mimics pollution that might be on our streets and sidewalks (students might be able to identify pollutants like car oil, soap from sidewalk cleaning, and dog waste) and the area at the bottom of the container is New York’s waterways. Then pour a cup or so of water on top of the plastic sheeting. Where does it go? What color is the water at the bottom of the container?
Transition: we call the concrete and asphalt in the city hardscaping – it’s just like how it sounds! Instead of absorbing water, hardscaping repels it, causing it to run right off into our river instead of going through the natural filtering process we saw in the watershed. What’s more, hardscaping makes flooding worse because during big storms water can get trapped and has nowhere to go.
Show students the provided slides as you discuss.
Green Roof – Green roofs are designed to absorb rainwater so New York’s sewer system isn’t overwhelmed during major rain events. Rainwater is absorbed and “held” on roofs rather than running off into our storm sewers. It waters specially-suited plants and then evaporates from the roofs to support the continued working of the water cycle. Green roofs have the added benefit of absorbing heat and cold and modulating temperature fluctuation, which lowers heating and cooling costs for their buildings and reducing wasteful energy use.
Slideshow image shows how green roofs can easily be integrated into existing residential and commercial buildings on a small scale. Larger local projects include a recent greenroof installation in the Javits Center in Manhattan and on public buildings in Brooklyn and the Bronx.
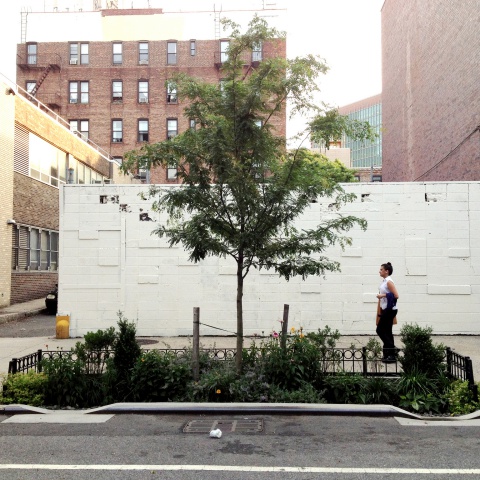
Bioswale – Bioswales intervene when water is already running off into New York’s storm sewers. Curbside cuts direct water into “rain gardens” that can absorb water and keep it from running into drains. Any excess water that does accumulate can exit out at the other side.
For an excellent series of cross-sections on NYC bioswales, see the NYC Department of Environmental Protection’s handout “Bioswale Care Handbook”: http://www.nyc.gov/html/dep/pdf/green_infrastructure/bioswalecare_handbook.pdf
Slideshow image shows new bioswale on Dean Street, Brooklyn. Notice the two curb cuts, the different types of plants, and the gravel used right at edge to facilitate quick drainage.
Permeable Concrete – Permeable concrete can be used in certain situations to provide the hard surfaces we might like for walking and playing, with the added benefit of allowing water to seep through to the ground below so it doesn’t run off into our stormwater system. Right now permeable concrete isn’t strong enough to support high-traffic wear and tear like on our roads, but it can be integrated into parkland for walkways and play surfaces. Engineers and scientists are always looking to improve permeable technology so we can integrate it more in the cityscape!
If you chose to make permeable concrete, you can demonstrate its properties by running water through the sample and asking students what they see.
The slideshow image shows installation of Stormcrete – a brand of permeable concrete – in Springfield Gardens, Queens. Springfield Gardens is vulnerable to rising sea levels and flooding during major storms.
Wetlands Restoration – water health isn’t just about runoff. Once polluted water is in our waterways there are ways to clean it naturally. The same processes of filtration and absorption are at play when we plant wetland grasses and re-establish organisms like oysters, which naturally clean and filter water.
The slideshow image is taken from Brooklyn Bridge Park, where landscape architects and city park planners have worked to integrate wetlands into the new park (along with permeable pavers, foreground).
Look around your neighborhood. Can you see examples of green infrastructure? Identify three different examples around New York City, sketch them in color, and bring them into the class to discuss.
Additional Resources
Fieldtrips: This content is inspired by the Future City Lab gallery in the Museum’s flagship exhibition, New York at Its Core. If possible, consider bringing your students on a fieldtrip! Visit http://mcny.org/education/field-trips to find out more.
Acknowledgements
This series of lesson plans for New York at Its Core was developed in conjunction with a focus group of New York City public school teachers: Joy Canning, Max Chomet, Vassili Frantzis, Jessica Lam, Patty Ng, and Patricia Schultz.
This project was made possible in part by the Institute of Museum and Library Services.
The views, findings, conclusions or recommendations expressed in these lessons do not necessarily represent those of the Institute of Museum and Library Services.

